In this article, i will show you how to deploy a django project to heroku without facing any errors.
Deploying a django project can be a nerve-racking situation for beginners who are just getting into the django space. But in this thread, i will show you how you can deploy a django project to heroku without stress.
REQUIREMENTS
To Deploy Your Django Project To Heroku, You Need To Have:
- Python And Django Installed
- An Heroku Account
- Heroku Cli Installed
- Git Installed
Now that you have all the requirements, the first thing to do is to install two python libraries which are 𝐠𝐮𝐧𝐢𝐜𝐨𝐫𝐧 and 𝐝𝐣𝐚𝐧𝐠𝐨-𝐡𝐞𝐫𝐨𝐤𝐮. Open up your terminal and run this command line:
𝐩𝐢𝐩 𝐢𝐧𝐬𝐭𝐚𝐥𝐥 𝐠𝐮𝐧𝐢𝐜𝐨𝐫𝐧 𝐝𝐣𝐚𝐧𝐠𝐨-𝐡𝐞𝐫𝐨𝐤𝐮
After installing the libraries, go to the root directory(folder which contains manage. py file) of your project, then create a new file and name it 𝐫𝐮𝐧𝐭𝐢𝐦𝐞.𝐭𝐱𝐭
In the file, input the python version you used in the project and save the file, like this:
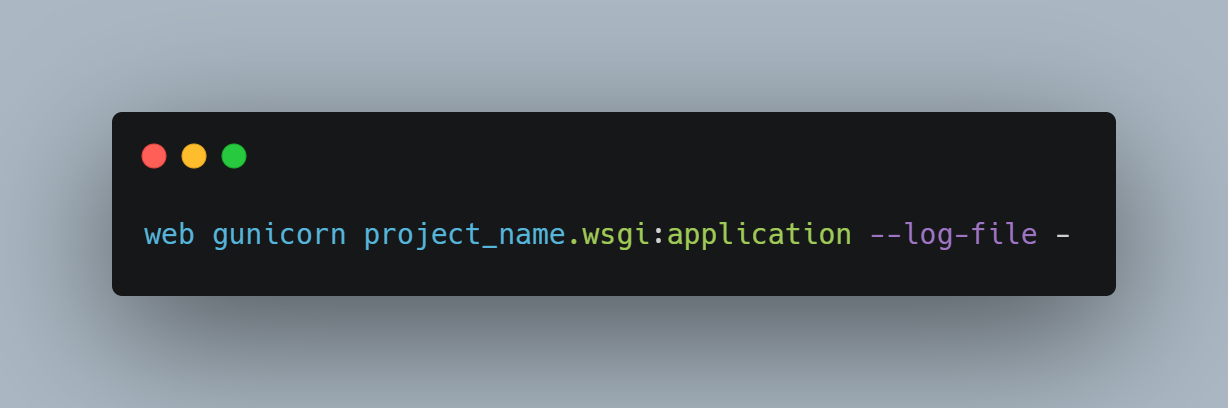
After saving the runtime.txt file, create a new file in the root directory and name it 𝐏𝐫𝐨𝐜𝐟𝐢𝐥𝐞 (with no file extension). In your Procfile, input this code below and save it:
Now, we have to get all the python libraries used in that project into one file, so that heroku can install them while deploying our web app.
To do this, open your terminal and run this command line:
𝐩𝐢𝐩 𝐟𝐫𝐞𝐞𝐳𝐞 > 𝐫𝐞𝐪𝐮𝐢𝐫𝐞𝐦𝐞𝐧𝐭𝐬.𝐭𝐱𝐭
Now, go into your settings .py file and import the following libraries by using this code:
𝐢𝐦𝐩𝐨𝐫𝐭 𝐝𝐣𝐚𝐧𝐠𝐨_𝐡𝐞𝐫𝐨𝐤𝐮
𝐢𝐦𝐩𝐨𝐫𝐭 𝐝𝐣_𝐝𝐚𝐭𝐚𝐛𝐚𝐬𝐞_𝐮𝐫𝐥
Now, look for an empty list variable named ALLOWED_HOSTS and change it to ALLOWED_HOSTS = ['*']
After doing that, go to the bottom of your settings .py file and input the code below:
𝐝𝐣𝐚𝐧𝐠𝐨_𝐡𝐞𝐫𝐨𝐤𝐮.𝐬𝐞𝐭𝐭𝐢𝐧𝐠𝐬(𝐥𝐨𝐜𝐚𝐥𝐬())
Now, we can finish up in our terminal. Open up your terminal and then login to heroku by running this command line:
𝐡𝐞𝐫𝐨𝐤𝐮 𝐥𝐨𝐠𝐢𝐧
The command line above will open up your default browser and prompt you to login.
Once you're logged in, go back to your terminal and create a new heroku app by running the command line below:
𝐡𝐞𝐫𝐨𝐤𝐮 𝐜𝐫𝐞𝐚𝐭𝐞 𝐧𝐚𝐦𝐞_𝐨𝐟_𝐚𝐩𝐩
where 'name_of _app' will be the name you want to name your app.
Now, follow the steps below by running the command lines accordingly one by one:
After following the steps above, now run the following command lines one at a time:
𝐠𝐢𝐭 𝐚𝐝𝐝 .
𝐠𝐢𝐭 𝐜𝐨𝐦𝐦𝐢𝐭 -𝐦"𝐓𝐡𝐞 𝐟𝐢𝐫𝐬𝐭 𝐭𝐢𝐦𝐞"
𝐠𝐢𝐭 𝐩𝐮𝐬𝐡 𝐡𝐞𝐫𝐨𝐤𝐮 𝐦𝐚𝐬𝐭𝐞𝐫
Boom!! your django project is successfully deployed on the web. When you go to your heroku dashboard, you should see the link to your web app, like this:
If you wish to see the video tutorial version on the topic, you can check it out here:


Post a Comment
3 Comments
thanks nigga
ReplyDeletesame command for windows operating system user
ReplyDeleteThanks for your tutorials
ReplyDelete